Livestreaming Presentation from C3 Tech Conference
• ByOn August 5th, I gave a talk at the 2020 Archdiocese of Los Angeles C3 Tech Conference on the topic of livestreaming for parishes. Below are the slides from my talk, along with a step-by-step guide for livestreaming from a mobile device to YouTube Live.
Presentation Slides
Mobile Livestreaming Guide
- Download the Larix Broadcaster app for iOS or Android.
- Note: This tutorial uses the iOS add directly, though the Android steps should be similar.
- Log into or create a Youtube account at Youtube.com
- From any page on YouTube, click the “Create” button in the top right of the screen and select “Go Live”.
- Note: The first time you go to livestream, a message will appear saying you must wait 24hrs after activating livestreaming on your account. Because of this, you should login and activate livestreaming at least a day before you plan to utilize it for the first time.

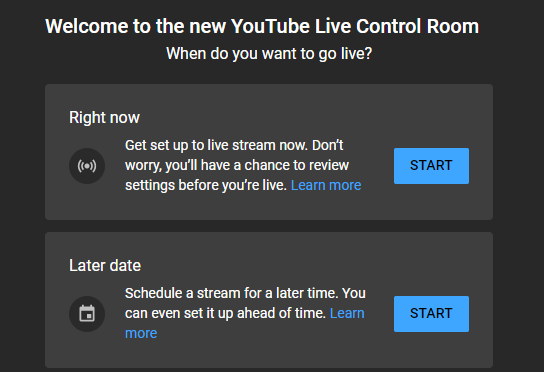
- Screen will appear asking you if you want to go live now or at a later date.
- Selecting “Right now” will take you to a screen to start livestreaming immediately, where “Later date” allows you to enter specific details for a future stream.
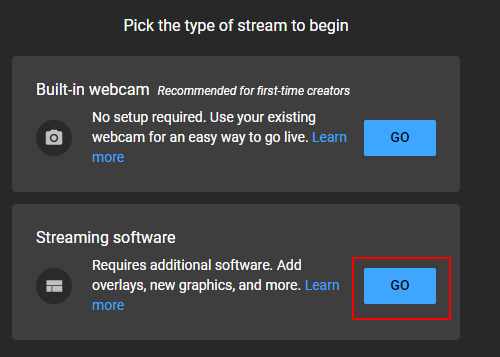
- If you select “Right now”, you will be taken to another screen to pick a type of stream. Select the “Go” button under “Streaming software”.
- This will take you to the livestreaming dashboard. From here there you can configure the setting for your stream.
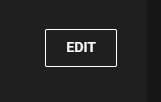
- To change the these name, privacy status, description, or category, select “Edit”.
- To change chat setting (including turning chat for the livestream on or off), select the gear in the top right of the screen and then click “Live Chat” in the popup window.
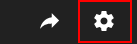
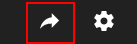
- To get a shareable link or embed code, select the arrow in the top right of the screen (link and embed code stay the same whenever you stream).
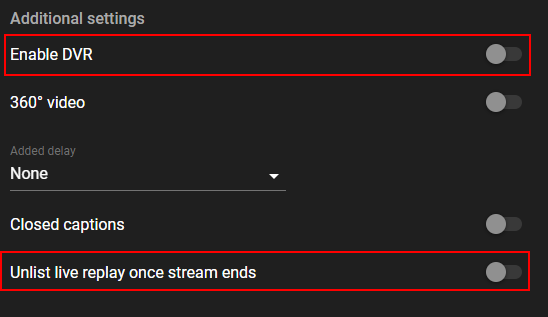
- In the main panel, use the “Enable DVR” and “Unlist live replay once stream ends” toggles to enable recording and recording public status respectively.
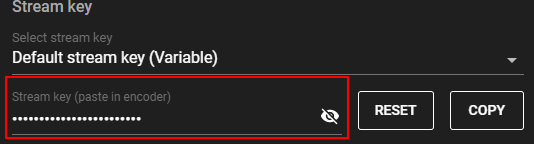
- The “Stream key” portion of the main panel has the information we will enter into the Larix Broadcaster app.
- Open the Larix Broadcaster app on your mobile device.
- Give the app permissions to access your device’s camera and microphone when prompted.
- Tap the gear icon on the top right side of the screen to open the “Settings” screen.
- Tap the “Connections” button at the top of the “Settings” screen.
- Tap the “+” icon in the top right corner of the “Connections” screen.
- Enter connection information from the YouTube “Stream key area” (only need to do this once)
- For “Name”, enter “YouTube”.
- For URL, rtmp://a.rtmp.youtube.com/live2/[YOURSTREAMKEY], where “[YOURSTREAMKEY]” is replaced with the value in the “Stream key” field from the YouTube setting page (this value is hidden, click the eye to show it).
- Leave other options set to defaults.
- Tap the “Save” button in the top right corner of the screen. This will take you back to the “Settings” screen where you should now see an entry titled “YouTube”.
- Tap the “<” icon in the top left corner of the screen to go back to the “Settings” page.
- By default, the Larix streams at SD resolutions. If your network speeds support it, it is advisable to change this to HD resolution.
- Tap the “Capture and encoding” button on the “Settings” screen.
- Tap the “Video” button toward the bottom of the screen.
- Tap the “Resolution” button at the top of the screen.
- Select the “1280x720” or “1920x1080” option.
- Tap the “<” icon in the top left corner of the screen until you return to the streaming view (ie, what your camera is seeing).
- Tap the red circle icon on the right side of the streaming view to start the livestream. After a moment, the live video show show in the top left of the YouTube settings page
- Larix Broadcaster Tips:
- Other options, such as camera or audio source, can be changed in the Larix settings (tap the gear on the top right of the main screen).
- To mute the microphone on your device, tap the mic icon on the left side of the main screen (audio levels are shown by the green bar).